[Google Android-구글 안드로이드] 본격적으로 만들어 보기-2 연습용 메인 프로젝트 만들기(메시지 화면 처리)
UI/Android ex 2008. 3. 12. 13:26모든 UI를 구성하는데 있어서 반드시 필요한 것은 많지만, 개발하면서 가장 필요한 것은 로그를 보는 것일 것이다. 아직까지 로그 처리를 어떻게 해야하는지는 정확하게 감이 잡히질 않는다. 하지만, 로그를 콘솔에서 보는 방법 이외에 가장 편하게 보는 것이 alert 창일 것이다.
지금까지 확인해 본 안드로이드의 메시지를 처리하는 방법은 두가지이다.
하나는 AlertDialog를 사용하는 것이고, 다른 하나는 Toast를 사용하는 것이다.
|
package com.min.summary; import android.app.Activity;//// import android.app.AlertDialog; private void alertMessage(String data) { private void viewMessage(String data, int messageLength) { |
앞에서 만들었던 AndroidAPISummary 클래스에 위와 같이 추가했다.
다른 레이아웃 설정부분과의 혼동을 피하기 위해서 버튼 설정하는 부분을 다른 메소드로 추가하였다.(setButtons() 메소드를 추가)
먼저 메시지를 처리하기에 앞서 이벤트를 처리하는 부분에 대해서 알아보자.
Button의 클릭 이벤트를 처리하기 위해서는 setOnClickListener 메소드를 사용해야만 한다. 이 메소드를 사용할때 필요한 매개변수 객체가 OnClickListener 인데, 인터페이스이므로, 이 인터페이스를 다른 클래스로 정의하거나, 위의 소스와 같이 필요할 때 구현하여야만 한다. (일반적으로 자바에서 화면단 이벤트를 처리하기 위해서는 저렇게 많이 구현해서 사용한다.)
내부적으로 정의한 OnClickListener의 내용은 프로그램이 구동될 때 수행되는 것이 아니라, 해당 이벤트가 호출되었을 때에만 구동되기 때문에, "수행하면 어쩌지?"라는 걱정은 하지 않아도 된다.
onClick 메소드는 View 객체를 받아서 처리되도록 되어 있으며, 매개변수로 받은 View는 해당 메소드에서 사용할 수 있다. 여기서 alertButton의 setOnClickListener 메소드에서는 alertMessage() 메소드를 호출했으며, 나머지 버튼들에서는 viewMessage() 메소드를 호출하도록 되어 있다.
그럼 이제 Toast와 AlertDialog에 대해서 알아보자.
Toast는 잠시 나타났다가 사라지는 메시지를 보여준다. static한 방법을 사용하면 되고, makeText() 라는 메소드에다가 메시지와 메시지를 뿌려줄 기간을 지정한다.
static Toast makeText(Context context, int resId, int duration)
static Toast makeText(Context context, CharSequence text, int duration)
duration은 Toast.LENGTH_SHORT 나 Toast.LENGTH_LONG 을 지정하면 된다.
Toast를 쓴 예제는 다음과 같다.
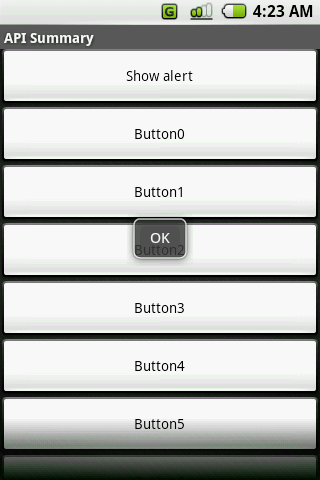
중간에 있는 조그만 OK 가 Toast로 띄운 메시지이다.
AlertDialog는 버튼이 있는 메시지창을 보여준다. 이것도 마찬가지로 static 한 방법으로 사용하면 되고, show() 라는 메소드에다가 여러가지 방법으로 지정하면 된다.
show()메소드의 종류는 다음과 같다. 여러분들의 입맛에 맞게 골라서 사용하기 바란다.
static AlertDialog show(Context context, CharSequence title, int iconId, CharSequence message, CharSequence button1Text, OnClickListener button1Listener, CharSequence button2Text, OnClickListener button2Listener, CharSequence button3Text, OnClickListener button3Listener, boolean cancelable, OnCancelListener cancelListener)
static AlertDialog show(Context context, CharSequence title, int iconId, CharSequence message, CharSequence buttonText, boolean cancelable)
static AlertDialog show(Context context, CharSequence title, int iconId, CharSequence message, CharSequence buttonText, OnClickListener buttonListener, boolean cancelable, OnCancelListener cancelListener)
static AlertDialog show(Context context, CharSequence title, int iconId, CharSequence message, CharSequence button1Text, OnClickListener button1Listener, CharSequence button2Text, OnClickListener button2Listener, boolean cancelable, OnCancelListener cancelListener)
static AlertDialog show(Context context, CharSequence title, Drawable icon, View view, CharSequence buttonText, OnClickListener buttonListener, CharSequence button2Text, OnClickListener button2Listener, CharSequence button3Text, OnClickListener button3Listener, boolean cancelable, OnCancelListener cancelListener)
static AlertDialog show(Context context, CharSequence title, int iconId, View view, CharSequence buttonText, OnClickListener buttonListener, CharSequence button2Text, OnClickListener button2Listener, boolean cancelable, OnCancelListener cancelListener)
static AlertDialog show(Context context, CharSequence title, int iconId, View view, CharSequence buttonText, OnClickListener buttonListener, CharSequence button2Text, OnClickListener button2Listener, CharSequence button3Text, OnClickListener button3Listener, boolean cancelable, OnCancelListener cancelListener)
참고로 CharSequence에는 String이나 StringBuffer, StringBuilder를 넘겨주면 되고, OnClickListener 에는 원하는 버튼의 Listener를 만들어서 그 Listener를 지정해주면 된다. 그리고, 마지막에 cancelable 이라는 boolean 값이 있는데, 그 값은 전화기의 종료버튼 위에 있는 <- 방향의 버튼을 눌렀을때 작동이 되는지 여부를 설정한다. 만약 true로 해 놓으면, 취소가 가능하다.
AlertDialog의 예는 다음과 같다.
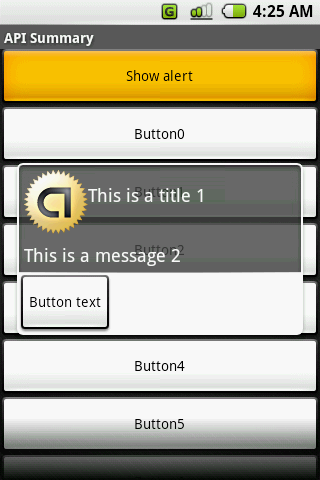
중간에 있는 저 버튼을 포함한 box가 AlertDialog를 이용한 화면이다.
'UI > Android ex' 카테고리의 다른 글
| [Google Android-구글 안드로이드] 본격적으로 만들어 보기-3 연습용 메인 프로젝트 만들기(안드로이드 메뉴 처리) (0) | 2008.03.21 |
|---|---|
| [Google Android-구글 안드로이드] ddms 사용하기 (안드로이드 화면 캡쳐하기) (0) | 2008.03.21 |
| [Google Android-구글 안드로이드] 본격적으로 만들어 보기-1 연습용 메인 프로젝트 만들기 (0) | 2008.03.09 |
| [Google Android-구글 안드로이드] UI 구현-2 일반적인 레이아웃 객체 (0) | 2008.03.06 |
| [Google Android-구글 안드로이드] UI 구현-1 화면 요소의 계층 (0) | 2008.03.05 |


